
As part of the Saluting those Who Serve game at Ben Hill Griffin Stadium, Air Pros CEO Anthony Perera was recognized on the field and surprised five local veterans with a free air conditioning unit.
Did you miss our previous article…
https://www.ab-sessions-plumbing-building-services.com/?p=554
How to Fix a Toilet That Won’t Flush
>
Stuck in that awkward plumbing limbo where your toilet won’t flush? Fear not. We’re here to explain the most common reasons your toilet may not be flushing and how you can fix them. If you live in L.A., your local plumbers at Mike Diamond are always ready to help.
Your toilet may be clogged (even if you can’t see it) or it may not be getting enough water. Any number of working parts could be faulty too. Before the next person in your home needs to go, let’s, ahem, plunge in and help you fix that toilet that won’t flush.
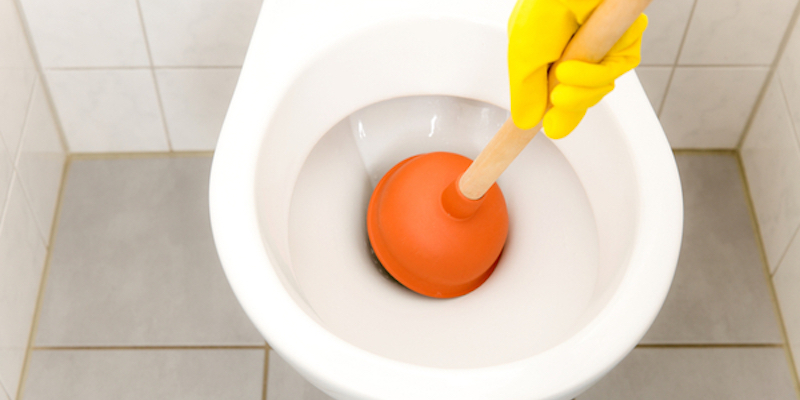
Your Toilet is Clogged.
An obvious reason why your toilet won’t flush, but a necessary one to consider is that it’s clogged. Never flush anything other than toilet paper and waste down your toilet. Wipes and other items can build up and block your sewer line. Clogs may not be visible if they’re further down the line.
A partial clog somewhere in the line could mean that your toilet will still flush but not very strong. A way to test for a partial clog is to pour a bucket with a gallon of cold water into the bowl. If your toilet still doesn’t flush properly, you probably have a partial clog.
What to do: Use a plunger or toilet auger to loosen things. Make sure you use a flange plunger, since the cup will help you create a better seal in the toilet bowl. Another way to loosen things is to turn off the toilet’s water, flush it, and then add hot (not boiling) water to the bowl. Let the water sit for several minutes, then flush it. If that doesn’t work, either, you should consider snaking the toilet. If your toilet still won’t flush after trying any of the above methods, you may want to consider professional drain cleaning services.

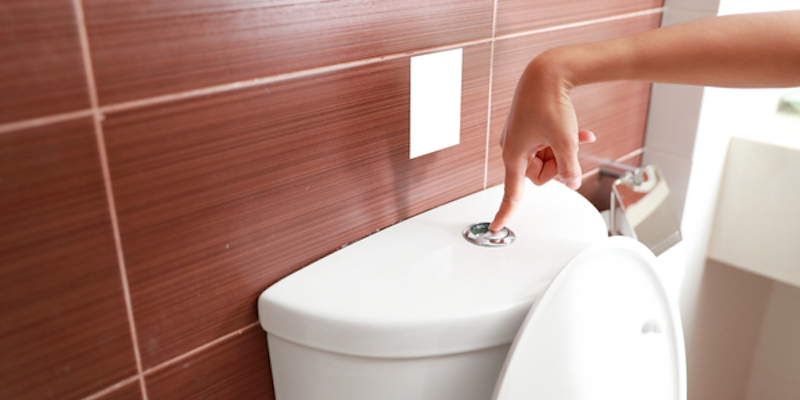
Check Your Toilet’s Handle and Chain
If the handle doesn’t do anything when you flush, you may have an easy fix. The handle connects to the flapper (the valve that holds the water in the tank) via a small length of chain. A simple explanation may be that the chain got disconnected at either end.
It’s also possible that the chain is the wrong length. When you depress the handle, the chain yanks up the flapper to initiate the toilet’s flush. If the toilet chain is too long, it won’t be able to yank up the flapper. If the flapper doesn’t rise, the toilet doesn’t flush. If the chain’s too short, then then your toilet flapper won’t seal properly and your toilet will run without ever completely filling with water.
What to do: Lift off the lid of your toilet tank. Check that both ends of the chain are connected. If they aren’t clip them back into place. If they are, pull the handle to test that the chain is the right length to lift the flapper fully open and also allow it to close tightly.
Why Won’t the Flapper in the Toilet Close?
As mentioned above, the flapper is the rubber valve at the bottom of your toilet’s tank. A toilet’s flapper opens and closes whenever you flush, allowing water to run from the tank into the bowl. When you depress your toilet’s handle, you’re lifting the flapper. Your toilet’s flapper is in constant contact with moving water that, over time, can bend or otherwise warp the flapper.
What to do: Examine your flapper. Does it seal tightly when it’s closed? Can you see wear or damage? Flappers are inexpensive and available at any local hardware store. Turn off the water at the supply valve, drain your toilet tank and replace the flapper. Make sure you reattach the chain. If you need help, we’re standing by.
djust or Replace Your Overflow Tube
Your toilet’s overflow tube is a part of the tank near the refill tube. Overflow tubes help empty water directly into the toilet bowl during a flush. These tubes are not infallible, unfortunately. The toilet’s constant pressure can easily crack or otherwise damage them. If the tube does crack, water will run into it instead of past it.
What to do: Replace the overflow tube to restore its ability to work. If your overflow tube isn’t working, give us a call and we’ll diagnose the problem and install the proper part.
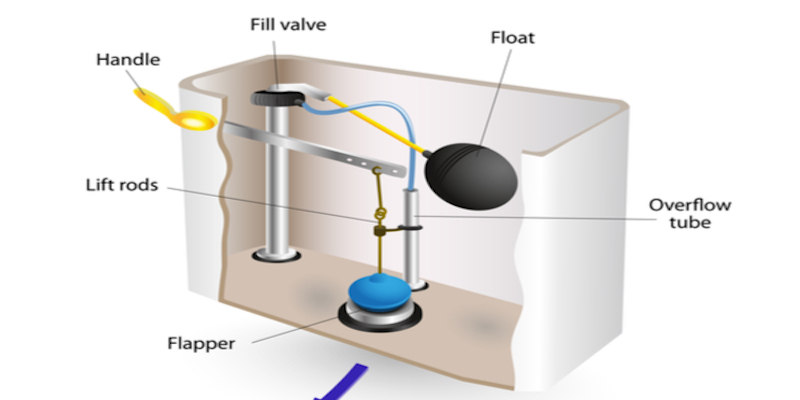
Your Toilet Tank isn’t Filling Up All the Way
When you flush your toilet, you release water from the tank into the bowl. Releasing a lot of water into the bowl quickly generates the suction required to flush the toilet. When the tank doesn’t contain enough water, it doesn’t create the necessary pressure for a strong flush. You may notice a weaker flush, or no flush at all.
What to do: Open the tank of your toilet to locate the float and the fill line. Flush the toilet with the tank open and watch the water drain into the bowl and fill back up. If the tube stops adding water before the float reaches the fill line, then your toilet won’t be able to perform a full flush. Adjust the float by moving its position on the arm that connects it to the refill tube. Flush again and see if you’ve solved the problem.
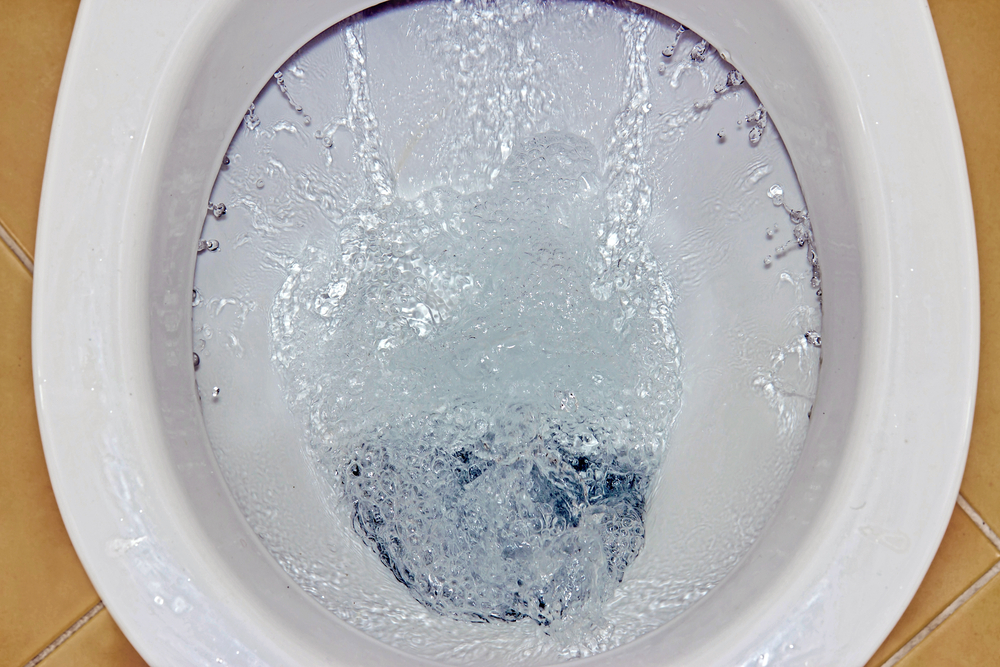
Clean Your Toilet Jets
The toilet jets are the little holes along the underside of the toilet bowl rim. When you flush, the water from the tank above rushes down through these small openings to create the swirling action you see. If they become clogged with lime or corrosion, it will limit the strength of your flush.
What to do: Get a small nail, length of wire or toothbrush and clean the jets. Use watered down bleach or a solution of vinegar. Place a small mirror on the underside of the rim to see which jets are clogged and dig out any blockage to restore them.
Fix Your Toilet that Won’t Flush
Hopefully, you’ve diagnosed the reason why your toilet won’t flush, and everything is moving again. If it’s still not working and you want Los Angeles’ best plumbers to have a look, call or contact Mike Diamond. We’re the plumbing experts who’ll turn your frustrations into flush elations.
The post How to Fix a Toilet That Won’t Flush appeared first on Mike Diamond Services.
What You Should Know About Pinhole Leak in Copper Pipe

Modern copper pipes should last for 20 years or more. Unfortunately, that doesn’t always happen, thanks to a particularly pernicious plumbing problem known as pinhole leaking. Pinhole leaks only occur in copper pipe. Under the right (worst) conditions, copper pipe may develop pinhole leaks within only two years of installation.
Pinhole leak in copper pipe is a common problem all over the US. Your copper pipes spring a pinhole leak when variations in your water’s ph (acid) value wear away at the inside pipe’s natural defenses against corrosion. If you use copper pipes (and, frankly, you should), you should know what a pinhole leak is and how to prevent it. Here’s where to start:
What is a pinhole leak?
The State of Maryland Task Force to Study Pinhole Leaks in Copper Plumbing defines pinhole leaks as, “the perforation of copper tube, pipe or fittings used for domestic water distribution as the result of pitting corrosion initiated on the interior/waterside surface with the subsequent leakage of water.”
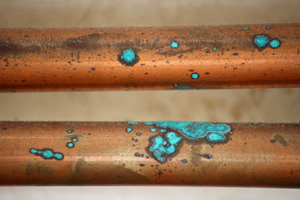
Pinhole leaks are generally very small (often less than ⅛” wide) and shaped like pinholes, hence the name. A pinhole leak itself represents the final “burst through” of a worsening corrosion problem on the interior of a copper pipe. In other words, pinhole leaks are not only a problem in and of themselves; they also represent the manifestation of long-term corrosion damage.
How does a pinhole leak in copper pipe occur?
As the Maryland Task Force notes above, pinhole leaks are caused by “pitting corrosion.” The Association for Materials Protection and Performance defines pitting corrosion as “is a localized form of corrosion by which cavities or ‘holes’ are produced in the material.“ Pitting corrosion only affects a very small portion of a copper pipe, eventually wearing away material more and more until it falls in on itself as a “pit” or “hole” – which, in turn, becomes a pinhole leak.
According to the Task Force’s research, pitting corrosion occurs for one of three reasons:
Chemical or mechanical damage to the protective oxide film that coats copper pipe,Localized damage to or poor application of protective coating, orThe presence of non-uniformities in the metal structure of the component, e.g. nonmetallic inclusions.
Any of these three inciting conditions could cause your pinhole leak in copper pipe in the following ways:
Chemical damage
This is the most likely cause of your pinhole leak in copper pipe. Your home water’s ph value has little to no bearing on your water’s quality or safety, but it can affect your pipes. In its own investigation of pinhole leak in copper pipe, the city of Folsom found four different ways water’s ph value could interact with its sulfate content, temperature, bacteria, and/or piping metal to produce the conditions for copper pitting.
Should any of these conditions occur in your pipes, then the chemical reaction will eat away at the protective oxide coating insulating the inner pipes metal from the water running through them. When this coating wears away completely in small places, then that small portion of the pipe is highly vulnerable to corrosion – hence, a pinhole leak forms.
Mechanical damage
Physical contaminants such as sediment or heavy metals present in the water supply may wear away at the inside of your pipes as they pass through. This could occur if your water is particularly hard or only locally treated (if it’s well water, for instance). Abnormally high water pressure may also scrape away the oxide coating of copper piping over time.
Localized damage or poor application of protective coating
It is unlikely but not impossible that your copper pipes are either of a poor quality or were improperly installed. This is more likely if your pipes were retrofitted and/or installed unprofessionally. Damaged copper pipes may not possess the same resistance to corrosion as they should, which can lead to pinhole leaking and other problems.
Non-uniformities in the metal structure
This is particularly likely if your pipes were only partially retrofitted into your home, ie: if your home uses both copper pipes and another type of metal for either piping or connective joints. When two different metals interact, especially in a solvent like water, the resulting tension can wear away at both. In the case of copper pipes, this tension will wear away at the oxide coating inside your pipes, eventually leading to pinhole leaks.
What are the signs there is a pinhole leak in my copper pipe?
If you suspect you may have a pinhole leak in copper pipe, look for any of the following signs:
Higher water bill: All leaks will raise your water bill, no matter how smallLower water pressure: Pressure leaks out of pinhole leaks just like water does, which will result in lower water pressure throughout your homeDripping sounds: Try to follow the sound to the leak itself, if possibleWater damage: Especially under or around your pipesMold or mildew growth: Especially near your pipesCondensation on your pipes: The outside of your pipes should never feel moist or wetPipe discoloration: If your copper pipes ever look too brown, green, or blue, then it means they’re partially oxidizing
However, keep in mind that pinhole leaks are notoriously difficult to find. After all, they’re very small and they can occur anywhere along a copper pipe. The best way to look for leaks is to turn off your water and check your water meter. If you’re sure you’ve turned off the supply but the water meter is still moving, then you have a leak. If you have copper piping and a leak, then it stands to reason you may have a pinhole leak.
How not to fix pinhole leak in copper pipe
Before we teach you how to fix your pinhole leaks, it’s important you learn what not to do. This is because there’s a lot of bad advice about repairing pinhole leaks out there. Not only are most of the DIY fixes you can read about ineffective, but in many cases they’ll create new problems.
For instance, you shouldn’t use either pipe repair clamps or replacement pipes affixed with couplings. Pipe repair clamps are fundamentally a temporary solution. They may even introduce chemical and metal alterations to your water, which can further wear away at the pipe. Likewise, couplings and replacement pipe negatively interact with the copper in your pipes. This can create the tension that wears away at oxide coating referred to above. By applying either of these methods to your pinhole leak, you might create a big problem by trying to solve a little one!
How to fix pinhole leak in copper pipe
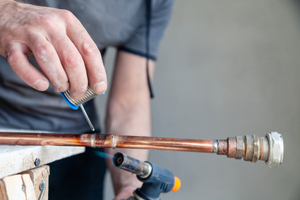
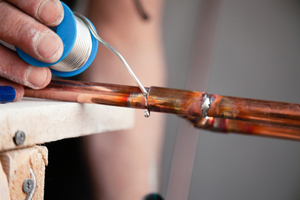
The only truly effective way to fix pinhole leaks in copper pipes is via the “sweating” replacement method. While you can find everything you need to attempt sweat coupling yourself at hardware stores, we generally don’t recommend homeowners try it themselves because it involves soldering and requires significant experience. If you insist on attempting sweat soldering yourself, however, or you’re just curious how it works, this is an overview:
NOTE: sweating pipe replacements are only recommended if you have to repair ½” of copper pipe or less. If the replacement job proves to require more significant replacement, you should call a professional.
Tools required:
Tube cutterCotton ragsMeasuring tapeSweat coupling replacement pipe¾” diameter wire fitting brushSolder wirePropane torch
Steps:
Locate and mark the leak on your pipeTurn off the water main! (this is important!)Drain the pipe of waterCut up to ½” of damaged section and surrounding pipe out using the tube cutterDry the new openings created by cutting away the damaged section. Stuff each side with the cotton rags to keep them from getting wet again. Only remove these cotton rags right before you solderMeasure the gap created by removing the damaged sectionMeasure and cut a replacement section of sweat coupling replacement pipe that’s 1” longer than the gap’s measurementSmooth the rough edges of the replacement pipe with the cutterSmooth the rough inner edges of the pipe with the wire fitting brushClean and smooth the cut sections of attached pipe, as you did with the replacement sectionSlide the sweat coupling replacement pipe over each end of the remaining pipes. Make sure about ½” of the replacement pipe fits over the old sectionSolder the new joint by holding the torch to one side and the tip of the solder wire to the other until enough of the wire melts into the opening to completely fill itTurn on the water and test the repair
How to prevent pinhole leaks in copper pipes
With a little investment and diligence, you can prevent the problems that create a pinhole leak in copper pipe listed above. Here’s how to make sure each one doesn’t give you grief:
Chemical damage
The chemical interactions that wear away at copper pipes typically occur because of high ph value in your water. Investing in a water softener can help prevent the kind of ph values that will harm your copper pipes. If you already have a water softener, make sure it’s functioning correctly and adjust it as needed.
Mechanical damage
A water softener will also remove many of the contaminants that could scrape up your copper pipes over time.
Water softeners won’t affect your water pressure, however. If your water pressure seems abnormally high, you may have to take other measures. Check the pressure meter on your water main. If it seems much too high, then you should ask your municipal water supplier why. If they can’t determine a cause, invest in a water pressure limiter to keep high pressure from hurting your pipes.
Localized damage or poor application of protective coating
If your pipes were improperly installed or look damaged, then we highly recommend replacing them as soon as possible. A professional plumbing inspection can tell you if you need to replace your pipes or if less major fixes are possible.
Non-uniformities in the metal structure
It may be possible to replace outdated joints, fittings, or old segments of pipe used throughout your home. We recommend a professional plumbing inspection to determine where the problematic pipe material is and what we should do about it.
Pinhole leak in copper pipe is a frustratingly common and significant problem for homeowners throughout the US. Fortunately, it’s also an easily fixed problem. If you think you may have a pinhole leak in your copper pipes, all you have to do is call Mike Diamond.
The Smell Good experts can find your pinhole leaks, fix them, and help you make sure they don’t happen again. Your copper pipes are far too effective (not to mention expensive!) for you to tolerate leaks, no matter how small. So stop tolerating and call now!
The post What You Should Know About Pinhole Leak in Copper Pipe appeared first on Mike Diamond Services.
Why Am I Running Out of Hot Water?


There are all kinds of reasons why your water heater isn’t producing enough hot water. It could be too small, the settings may be wrong, or there could be a more serious problem. Sediment buildup, broken dip tubes or heating elements, and leaks can all steal your hot water away.
By determining exactly how you’re running out of hot water, you can home in on the problem. Find the description that most closely matches your hot water issue below to find out what’s going on. Once you know why you’re running out of hot water so quickly, you can try to solve it yourself or you can call in the Smell Good Cavalry:
Your water comes out in spurts of hot and cold
If your hot water seems to run hot and cold randomly regardless of what you tell it to do, then there may be sediment build-up in your water heater’s tank. Sediment builds up faster when you have hard water, when your pipes are old, or if your anode rod is worn out. Sediment build-up leaves less space for hot water in the tank. It can absorb too much of the heat generated by the heating element.
First, try flushing and draining the tank. We recommend either doing it yourself or having the pros perform a full drain and flush around once per year. If you keep running out of hot water even after a flush, then it’s possible that too much sediment has built up. Unfortunately, the only way to solve that problem is to replace your tank. In fact, you should replace it quickly… or it could, uh, explode.
You keep running out of hot water after a very short period of time

Most water heaters have two heating elements: one at the top, and one at the bottom. The top heating element repeatedly re-heats the water near the top of the tank. The bottom heating element heats all the water added to the tank to store it at a constant hot temperature. At least, that’s what it should be doing.
If your bottom heating element stops working, then it isn’t heating most of the water in your tank properly. Instead, you’ll be forced to rely on the small quantity of water your top element heats. When that water runs out, your water heater will send you unheated water instead… which makes for the nasty shower surprise you’re all too familiar with. To fix this problem, replace your tank’s bottom water heater element. Give us a call and we’ll take care of it fast.
Your water never gets above a lukewarm temperature
The water heater’s dip tube pushes the cold water to the bottom of the tank. There, the lower element heats it before you use it. If your water heater’s dip tube breaks, then all the replacement cold water added to the tank mixes with the hot water already inside. As a result, you get a lukewarm mixture of hot and cold water that satisfies nobody, like a reverse Goldilocks.
If your dip tube is broken, you may discover small chunks of plastic in your showerhead or sink strainers. Take off your showerhead and look for debris. If you find any, then you could try to test and replace your dip tube yourself, or call in the pros. Replacing a dip tube is relatively cheap, quick, and easy.
You’re running out of hot water before everyone is finished with it
Does this sound familiar? You’re locked in a constant competition against everyone in your home to seize the bathroom first thing in the morning. If you’re unlucky enough not to be the early bird, then you’d better shower quickly or risk a rude (and cold) awakening. And forget about showering while someone’s washing dishes, running the dishwasher, or doing the laundry – that’s a one way ticket to your own private Antarctica.
Your water heater is probably simply too small. Conventional water heaters can supply an amount of water equal to the size of their storage tank. If you use more water than the tank can provide, then your heater spends 20 to 30 minutes reheating new water. If your water heater is too small for your needs, you’ll have to replace it with a bigger one.
You’re not getting any hot water at all
Did you know that your water heater has a thermostat that dictates how hot your water gets? It works just like any other thermostat: you tell it how hot you want your water, and your elements heat to that temperature. If you’re not getting any hot water at all, then your thermostat may be malfunctioning… or simply set improperly!
Most water heaters have a reset button. Troubleshooting your thermostat is as easy as clicking that button. In case that doesn’t work, locate the thermostat itself and make sure it’s set correctly. If you still have the owner’s manual, the manufacturer should have included the settings inside. If you’re like 99% of people and you have no idea where that manual is, find the settings online. Reset to the heat you want, then try resetting again. If that still doesn’t do the trick, give us a call.
If you don’t see your particular issue listed here, don’t worry. These scenarios cover the common problems, but they’re by no means exhaustive. If you still don’t know what to do after either failing to find your problem or trying our proposed solution to no avail, you still have your trump card: us.
Whatever the strange, unique, unlikely reason you’re running out of hot water, Mike Diamond’s experts will find it and will provide a solution. We’ve yet to be stumped by even the most outlandish of hot water hang ups – and we’ve seen some doozies. Next time your shower takes an unpleasant turn for the freezing, just give us a call right away. Or at least… as soon as you get out and warm up.
The post Why Am I Running Out of Hot Water? appeared first on Mike Diamond Services.
Did you miss our previous article…
https://www.ab-sessions-plumbing-building-services.com/?p=501
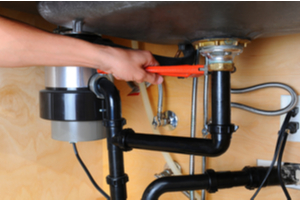
Is My Garbage Disposal Leaking?

Garbage disposals usually leak from three places: the top, the pipe connections, and the bottom. To find out if your disposal is leaking, check each common place where leaks start. Use a flashlight to check for condensation, puddling, and other signs of water accumulation on or beneath your disposal.
Each common garbage disposal leak happens for a different reason. Usually, a minor component is simply too loose or it’s worn out. By finding where your garbage disposal is leaking, you’ll be able figure out why it’s leaking and how you can fix it. Here’s everything you need to know to fix your garbage disposal’s leak quickly and accurately.
Where is my garbage disposal leaking from?
Garbage disposals commonly leak from four different places:
The sink flange at the top of the garbage disposal. This connects the disposal to the top of the sink.The dishwasher hose connection on the side of the disposal. This is where the flexible plastic dishwasher hose connects to the disposal.The drain line connection, also located on the side of the disposal. This is where the main drain pipe connects to the disposal via curving metal or PVC plastic pipes.The reset button on the bottom of the disposal. This button deactivates the disposal if it jams or the motor overloads.
How can I tell if my garbage disposal is leaking?

First, look for the obvious signs. Check under your kitchen sink for puddling water, dampness, dripping, or a musty smell. If you see any signs of leaking, check to make sure it isn’t the sink itself or the sink’s p-trap. Then, grab a flashlight and bucket to look for each common garbage disposal leak.
Turn off the garbage disposal and unplug it completely. Then, fill up the sink with water about halfway. If you have food coloring, add it to the water to make the leak easier to spot. You can locate the leak in the following ways:
The sink flange: Check for dripping or water accumulation around the top and bottom of the ring of the flange. Use the flashlight to look for water coloring and feel for wetness by hand.The dishwasher hose connection: To properly look for this leak, you’ll have to run your dishwasher. Start the dishwasher without turning back on the disposal. Watch the hose as water runs from the dishwasher drain through it into the disposal. Pay particular attention to the connections between the hose and disposal.The drain line connection: Check the connection between the drain line and disposal. Pay particular attention to the screws that fasten the line to the disposal and to the gap between the disposal and drain line.The reset button: The reset button is in the center of the bottom of the disposal unit. Shine the flashlight under the disposal to look for it. Check for a slow, constant dripping or water accumulation beneath the unit.
Why is my garbage disposal leaking?
Each of the four common leaks outlined so far have different causes and fixes. Here’s where your leak is coming from and what caused it:
The sink flange: The sink flange is held in place by plumber’s putty and bolts. If the putty deteriorates or the bolts rust or loosen, the watertight seal between the flange and sink may break, leading to your leak.The dishwasher hose connection: If the dishwasher hose is leaking, it’s usually because the screws holding it to the disposal have loosened. This can happen because of rust or simply as a result of time and jostling. It’s also possible the drain hose or clamp are leaking.The drain line connection: If the drain line is leaking, then either the screws securing to the disposal have worn out, or the rubber gasket inside the mounting assembly itself is leaking. Remove the screws, take down the drain line, and check the gasket inside for signs of wear and tear.The reset button: If your garbage disposal is leaking from either the reset button or any other part of the bottom of the disposal, then it probably means a seal inside the unit itself has worn out. This can happen when a garbage disposal gets old.
How to Fix a Leaking Garbage Disposal
Now that you’ve identified the where and why, you’re prepared to fix the actual problem. Luckily, fixing a leaking garbage disposal is usually pretty straightforward–even if the fix isn’t always what you’d like to hear:
The sink flange: Unscrew the bolts and check for rust or other deterioration, and replace them if you find any. Then, remove the flange, scrap off the putty holding it in place, and reapply fresh putty. Turn back on the water to test the seal.The dishwasher hose connection: First, try using a screwdriver to tighten the screws on the metal clamp connecting the hose to the disposal. If the screws don’t seem to tighten properly, consider replacing them. It’s also possible the hose itself is leaking, in which case you’ll have to replace it.The drain line connection: You may be able to fix this leak by tightening the connection between the pipe and disposal. Try un-attaching and reattaching the pipe if tightening doesn’t work. If you’re still having issues, try replacing the screws or gasket. You could also use a pipe clamp and tighten with a screwdriver.The reset button: Unfortunately, if your garbage disposal leaks from the bottom, then it’s probably simply time to remove the garbage disposal and replace it. If one internal seal is worn out, after all, then the rest are probably getting there too.
By following the directions above, you should be able to identify and fix just about any garbage disposal leak you’re dealing with. Of course, “should be able to” doesn’t necessarily mean will be able to. Sometimes unusual leaks happen. These leaks can be tough to figure out, much less fix!
Whether you have a weird leak you can’t get a handle on, or you just need to ask some questions, feel free to call Mike Diamond any time. We’ve got everything we need to handle any garbage disposal problem you can throw at us.
The post Is My Garbage Disposal Leaking? appeared first on Mike Diamond Services.
Did you miss our previous article…
https://www.ab-sessions-plumbing-building-services.com/?p=496
Gas Furnace Maintenance Tips to Keep the Heat Coming

>
Even if winters don’t exactly get Arctic-cold in Southern California, it doesn’t mean that you want your gas furnace to go out. The best way to avoid potential trouble on those chilly evenings is with regular furnace maintenance. Keeping your furnace clean and in good working order means it’s always ready for that unexpected cold front.
To keep your gas furnace working when you need it, we recommend an annual furnace checkup. During the rest of the winter, follow these seven furnace maintenance tips to keep the heat coming:
Work under safe conditions
Before you do anything, make sure you’re working safely. Gas can be dangerous if you don’t handle it correctly. Before you begin any serious furnace maintenance, make sure you turn everything off. If you’re not 100% sure what you need to turn off to get the work done, trip the main circuit breaker to verify your safety during the maintenance process.
Finally, if you smell gas, don’t try to shut anything off or turn it on–instead, leave the premises immediately. Have a professional flush the gas from the house and fix the leak before you do any more work.
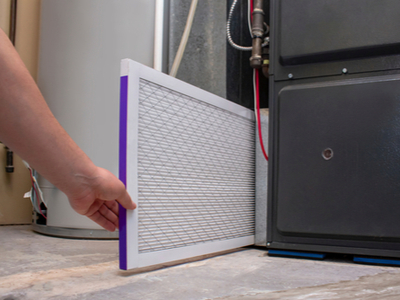
How to Check Your Furnace Filter
A gas furnace’s filter prevents dirt from entering the unit and building up. Build up can lead to malfunctions or even fires. A filter also keeps the warm air blown into your home clean. Check your filter at least once every other month. This holds true for summer as well as you run your air conditioner.
Your filter is simply a cardboard rectangle with a mesh covering. It easily slides in and out of its designated slot, usually at the bottom of your furnace. You can find most replacement filters at your local hardware or home improvement store.
Test your thermostat
If the temperature setting on your thermostat doesn’t match the actual temperature, you may have one of two furnace-related problems:
The thermostat itself has stopped working.There’s a disconnect between the wall unit and the furnace.
Either way, if this happens frequently, you’ll want to repair or upgrade your thermostat. A new, programmable energy efficient thermostat isn’t expensive and usually pays for itself in energy cost savings.
Clean the blower
While checking the filtration system, also check the blower. The blower is further inside, and you should be able to see it when you change the air filter. It’s a circular intake with a wheel-like fan.
Wipe the blower down with a damp cloth each time you change the filter. Cleaning the blower prevents dust or dirt that may have escaped through the filter from getting further inside the furnace.
Regularly check and clean your vents
All gas furnaces have a venting system that prevents unsafe heat build-up. Just like with anything else that never moves, dust builds up both on and within furnace vent systems. Clean them with a scrubbing brush, vacuum cleaner, and damp cloth to ensure their continued effectiveness.
Inspect your flue pipe for cracks or holes where dangerous carbon monoxide could leak.
Inspect the fan
This maintenance is best left to a professional. It isn’t as easy to get to the fan within the furnace as it is to get to everything else. Getting pre-winter furnace maintenance is recommended to keep up with part changes and cleaning needs. Don’t let small problems become big.
Clean Your Air Ducts
Vacuum them out or have a professional do it. Dust, pet dander and debris that builds up inside your ducts eventually gets blown all over your home. Clean ducts work better and mean cleaner air.
Annual Furnace Maintenance in Los Angeles
Keeping your furnace clean is the easiest way to extend its life and keep it from breaking down. Hopefully this furnace maintenance checklist helps you get started.
Not everyone is up to this level of DIY maintenance. If you want a certified technician to perform your gas furnace cleaning, the trained professionals at Mike Diamond are ready and waiting to help you out.
The post Gas Furnace Maintenance Tips to Keep the Heat Coming appeared first on Mike Diamond Services.
Did you miss our previous article…
https://www.ab-sessions-plumbing-building-services.com/?p=478
Water Environment Federation Honors Excellence in Infrastructure Operation, Design, Promotion
The Water Environment Federation (WEF) proudly announces the 2021 class of WEF Awards for Operational and Design Excellence recipients, as well as winners of WEF’s Citation of Excellence in Advertising. These awards recognize individuals and organizations that have made outstanding contributions to the water environment profession through their innovative approaches to fabricating, marketing, or utilizing […]
The post Water Environment Federation Honors Excellence in Infrastructure Operation, Design, Promotion appeared first on Plumbing Perspective | News, Product Reviews, Videos, and Resources for today’s contractors..
Real Estate Group Challenged by Leaks and Water Damage on Jobsites
As a leading global construction company, Tidhar’s success relies on the company’s reputation for quality and customer satisfaction. The dynamic international real estate group employs a unique combination of entrepreneurial, planning and execution capabilities, advanced management concepts, and uncompromising quality and service to develop, build and operate residential and commercial projects around the world. Challenge: […]
The post Real Estate Group Challenged by Leaks and Water Damage on Jobsites appeared first on Plumbing Perspective | News, Product Reviews, Videos, and Resources for today’s contractors..
Plumbing and Drain Cleaning Checklist

Plumbing maintenance is not something you ever want to skip. Your house is one of your most significant investments, and you need to protect it. Unfortunately, plumbing problems can lead to big bills and even bigger headaches down the line. Plumbers offer the best plumbing services for all your plumbing needs.

Plumbing maintenance isn’t something you want to skip. Even a one-time blockage can lead to significant money loss if left unfixed. In addition, one small leakage can cost a lot of water as the water spills out slowly drip by drip. One drip per minute in just one faucet at your house adds up to about 7 gallons per minute and 2.8 gallons of water per day!
It’s not uncommon to see landlords skip plumbers’ services because they’re afraid that doing the work will be too much trouble or expense. They assume that if they’ve signed a contract stating that they’ll be charged for every small thing that comes up, then they already owe the contractor money for the plumbing maintenance. But, on the other hand, it shouldn’t cost much if the contractor is doing a great job.
You can do several things to avoid having to call professional help with a minor plumbing maintenance issue. One of them is to perform maintenance on your system. For example, if you notice no water coming out of your faucets or the pipes are covered with mineral deposits, do a simple check to see if there’s a blockage. Next, take a close look at the system and see if it’s leaking. If you see something, you should probably have it repaired as soon as possible, but if there isn’t any way to fix it right away, it’s time to consider calling professionals for plumbing help.
On top of performing preventative maintenance on your pipes and fixtures, there is also the option to have it professionally fixed. This might cost more than having it repaired on your own, but it will be worth the extra cash when you notice that a leaky pipe is slowly ruining your kitchen or bathroom sink. Another benefit of calling a professional plumber or a company to come and take a look at your lines is that they can let you know if there is a way to avoid having a pipe burst altogether. For example, certain materials can reduce the likelihood of eruptions by keeping the pipes from leaking. If you don’t know how to do this preventative maintenance yourself, then don’t hesitate to hire a professional company to do it for you.
Other minor maintenance tasks should be performed regularly aside from preventative methods to keep your drains and pipes working correctly. For instance, your sewer snake should be changed monthly, and your septic tank should be pumped approximately every three months. If you’re dealing with a reasonably significant blockage or clog, you might want to have your sewer snake pulled periodically as well. More minor clogs can usually be handled with a simple household mixture of baking soda and water. These simple drain-clearing methods should keep most small clogs from developing into a more severe problem.
When plumbing maintenance isn’t enough to keep pipes from leaking, the last resort is to contact a heating and cooling company. Having your furnace or water heater repaired the soonest possible, will extend its life and save you money. It would be best if you also had your air conditioner serviced at least once a year to eliminate existing problems and prevent new ones from forming. Several companies specialize in servicing residential and commercial customers, so it should be easy to find a reputable company you can trust. If you’re still not happy with the services provided, you can always opt to move on and hire a professional plumber who will perform his best to resolve any plumbing problems you encounter. However, before you make such a decision, take the time to consider the benefits of having an HVAC professional on call.
With all of these plumbing maintenance tips, you should be able to avoid expensive repairs. By following even just a few of the information found here, you can keep your drains clean, your heating and cooling systems running smoothly, and you avoid spending a fortune on unexpected repair bills. So if you’ve been neglecting your plumbing system for years, it’s time to take action. Get started today by completing your checklist.
Finding A Reliable Plumber For Your Home
What are the primary services that a dependable plumber provides? Replacement, Installation, and Environmental Monitoring. Plumbers ensure that you’re getting high-quality materials and workmanship to your household or commercial building fixtures.

You may call a plumber to address a leaky faucet or clogged sink, or plumbing outlet. Plumbers also offer services like toilet repair and bathroom renovation. Drainage problems, including tree root intrusion, blockages, clogs, odor leaks, sink seepage, pipe corrosion, and burst pipes, are some of the plumbing services that a plumber offers. They can also provide waterproof floors and gutters and can even help with fire escapes and emergency exit signs and alarms.
Plumbing services are usually a given when purchasing a home or apartment. But did you know that there are other plumbing issues that you might have to address? For instance, did you know that replacing an outdated heating system could cost up to $500 more than replacing the whole thing? A simple checkup by a licensed plumber can tell you whether or not your water heater is safely operational. He can also tell you whether to get a gas water heater, electric tankless heater, or a combination of both to save money on energy costs.
Backflow is another issue that a plumber can check out. It refers to the backflow of waste from plumbing fixtures such as the septic tank or toilet. For example, an overflowing septic tank can create backflow issues since it can let waste back into the environment when flushed down the toilet. Other examples of backflow include using bottled water to wash vegetables and drink from sinks and toilets, using a sink with improper stopper seals, and allowing soap scum to build up in the pipes leading to the tub or shower.
If your home was built before 1977, there is a good chance that your plumbing fixtures are not working correctly. Before you make any changes to your plumbing system, it’s best to hire a licensed plumber. Licensed plumbers are better equipped to handle plumbing emergencies because they receive regular training on how to deal with situations that might arise. In addition, most plumbing experts are also familiar with state codes, meaning that they will know what to do in an emergency. Finally, a plumber who works for a licensed company will be insured, which can save you a lot of hassle if something goes wrong.
When you start thinking about getting a professional plumber to care for your plumbing needs, you should consider the following questions. First, are you getting all of your references from local plumbers? Second, what were they able to tell you about the plumber’s customer service? Third, did the plumber take the time to answer all of your questions, so you can feel confident that you’re getting someone who is reliable?
If you’re looking for quality residential plumbers in your area, then you need to find a company that offers both local and satellite services. A satellite plumbing company can provide maintenance services anywhere in the city where the residential plumbers service most of their clients. Therefore, they can serve entire cities instead of sticking to one neighborhood. In addition, satellite companies tend to have plumbers who have experience working in all city areas and are familiar with the pipe works so that installation will be fast and easy.
Leaks can occur in any part of a house, but the bathroom is usually the biggest problem. It’s the part of the house that gets the most use, as people go in and out all day long. Professional plumbers know where to find leaks and can repair them quickly and efficiently. Toilet pipes tend to get backed up constantly. You don’t need to pay someone else to deal with the problem when you can take care of it yourself!